
This guide is intended for Linux servers (e.g., CentOS, Ubuntu, OpenCloudOS). #
📋 Table of Contents #
- Environment Setup: Create a User & Install Node.js
- Discord Setup: Register a Bot & Obtain a Token
- OpenClaw Configuration: Allowlist & IDs
- Process Management: Keep It Running 24/7 in the Background
- FAQ & Troubleshooting
Phase 1: Environment Setup #
1. Create a User and Grant Permissions #
Log in to your server terminal as root and run:
# 1. Create a user — pick a name, e.g. 'kyoyarn'
useradd -m kyoyarn

# 2. Set a password (passwd + username, you'll be prompted to enter it twice)
passwd kyoyarn

# 3. Grant admin privileges (replace 'kyoyarn' with your username)
# Note: CentOS/OpenCloudOS typically uses the 'wheel' group; Ubuntu uses 'sudo'
usermod -aG wheel kyoyarn
# If you get "group 'wheel' does not exist", try: usermod -aG sudo kyoyarn
2. Install Node.js (v18+) #
OpenClaw requires a Node.js environment. (If your server already has Node.js v18 or above, you can skip this step.)
# Switch to the new user (replace 'kyoyarn' with your username)
su - kyoyarn

# Install Node.js via NVM (the most reliable method)
curl -o- https://raw.githubusercontent.com/nvm-sh/nvm/v0.39.7/install.sh | bash

# Reload environment variables
source ~/.bashrc

# Install and use Node v20
nvm install 20
nvm use 20

# Verify the installation
node -v  # Should output v20.x.x
3. Install OpenClaw #
# Install OpenClaw globally
npm install -g openclaw@latest

# Initialize the config directory
mkdir -p ~/.openclaw

# Verify the installation
openclaw --version
Phase 2: Discord Setup #
1. Create an Application #
- Log in to the Discord Developer Portal.
- Click New Application in the top-right corner and give it a name (e.g.,
MyOpenClaw). - Click Bot in the left sidebar, then click Reset Token.
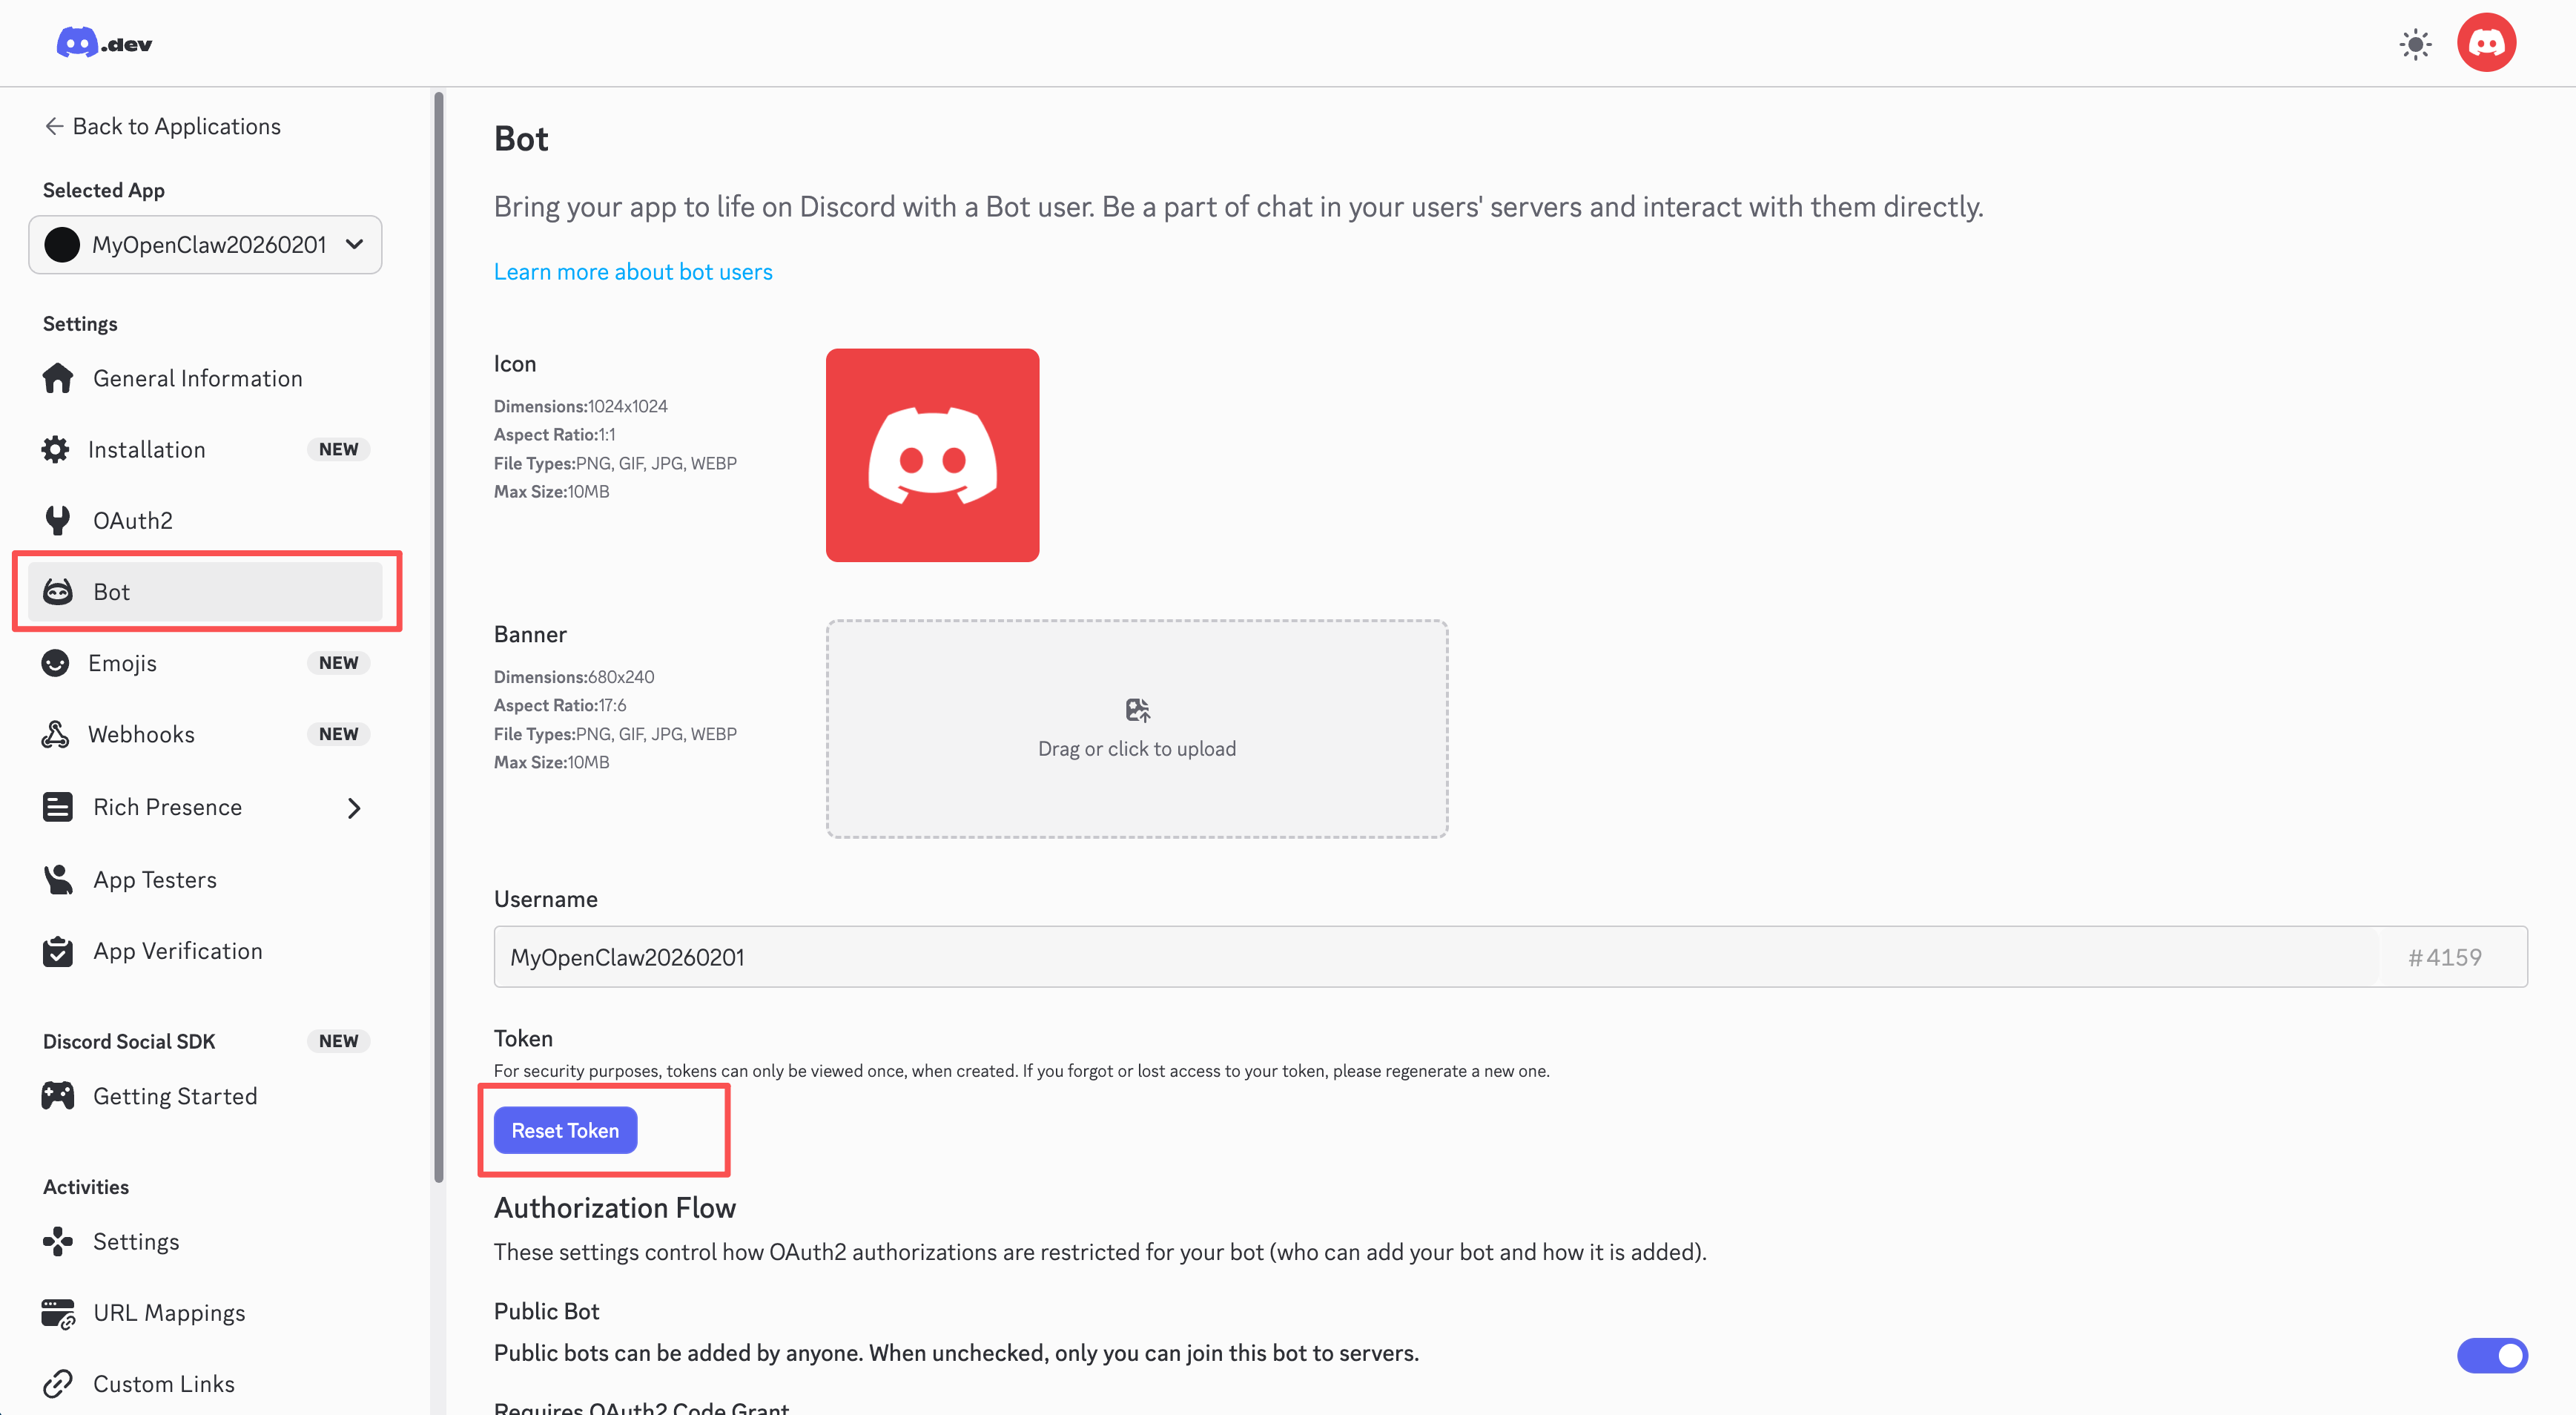
- 👉 Copy and save the Token immediately — once you close the page, it’s gone.
2. Enable Privileged Intents (Critical Step) #
On the Bot page, scroll down to Privileged Gateway Intents and enable all three:
- ✅ Presence Intent
- ✅ Server Members Intent
- ✅ Message Content Intent (without this, the bot is deaf)
- Click Save Changes.

3. Generate an Invite Link #
-
Click OAuth2 -> URL Generator in the left sidebar.
-
Under Scopes, check:
bot.
-
Under Bot Permissions, check the ones you need. The following are required:
Read Messages/View ChannelsSend MessagesRead Message History
- Copy the generated URL, open it in your browser, and invite the bot to your server.
Phase 3: OpenClaw Configuration #
1. Obtain IDs (Developer Mode Required) #
Go to Discord Settings -> Advanced -> Enable Developer Mode.
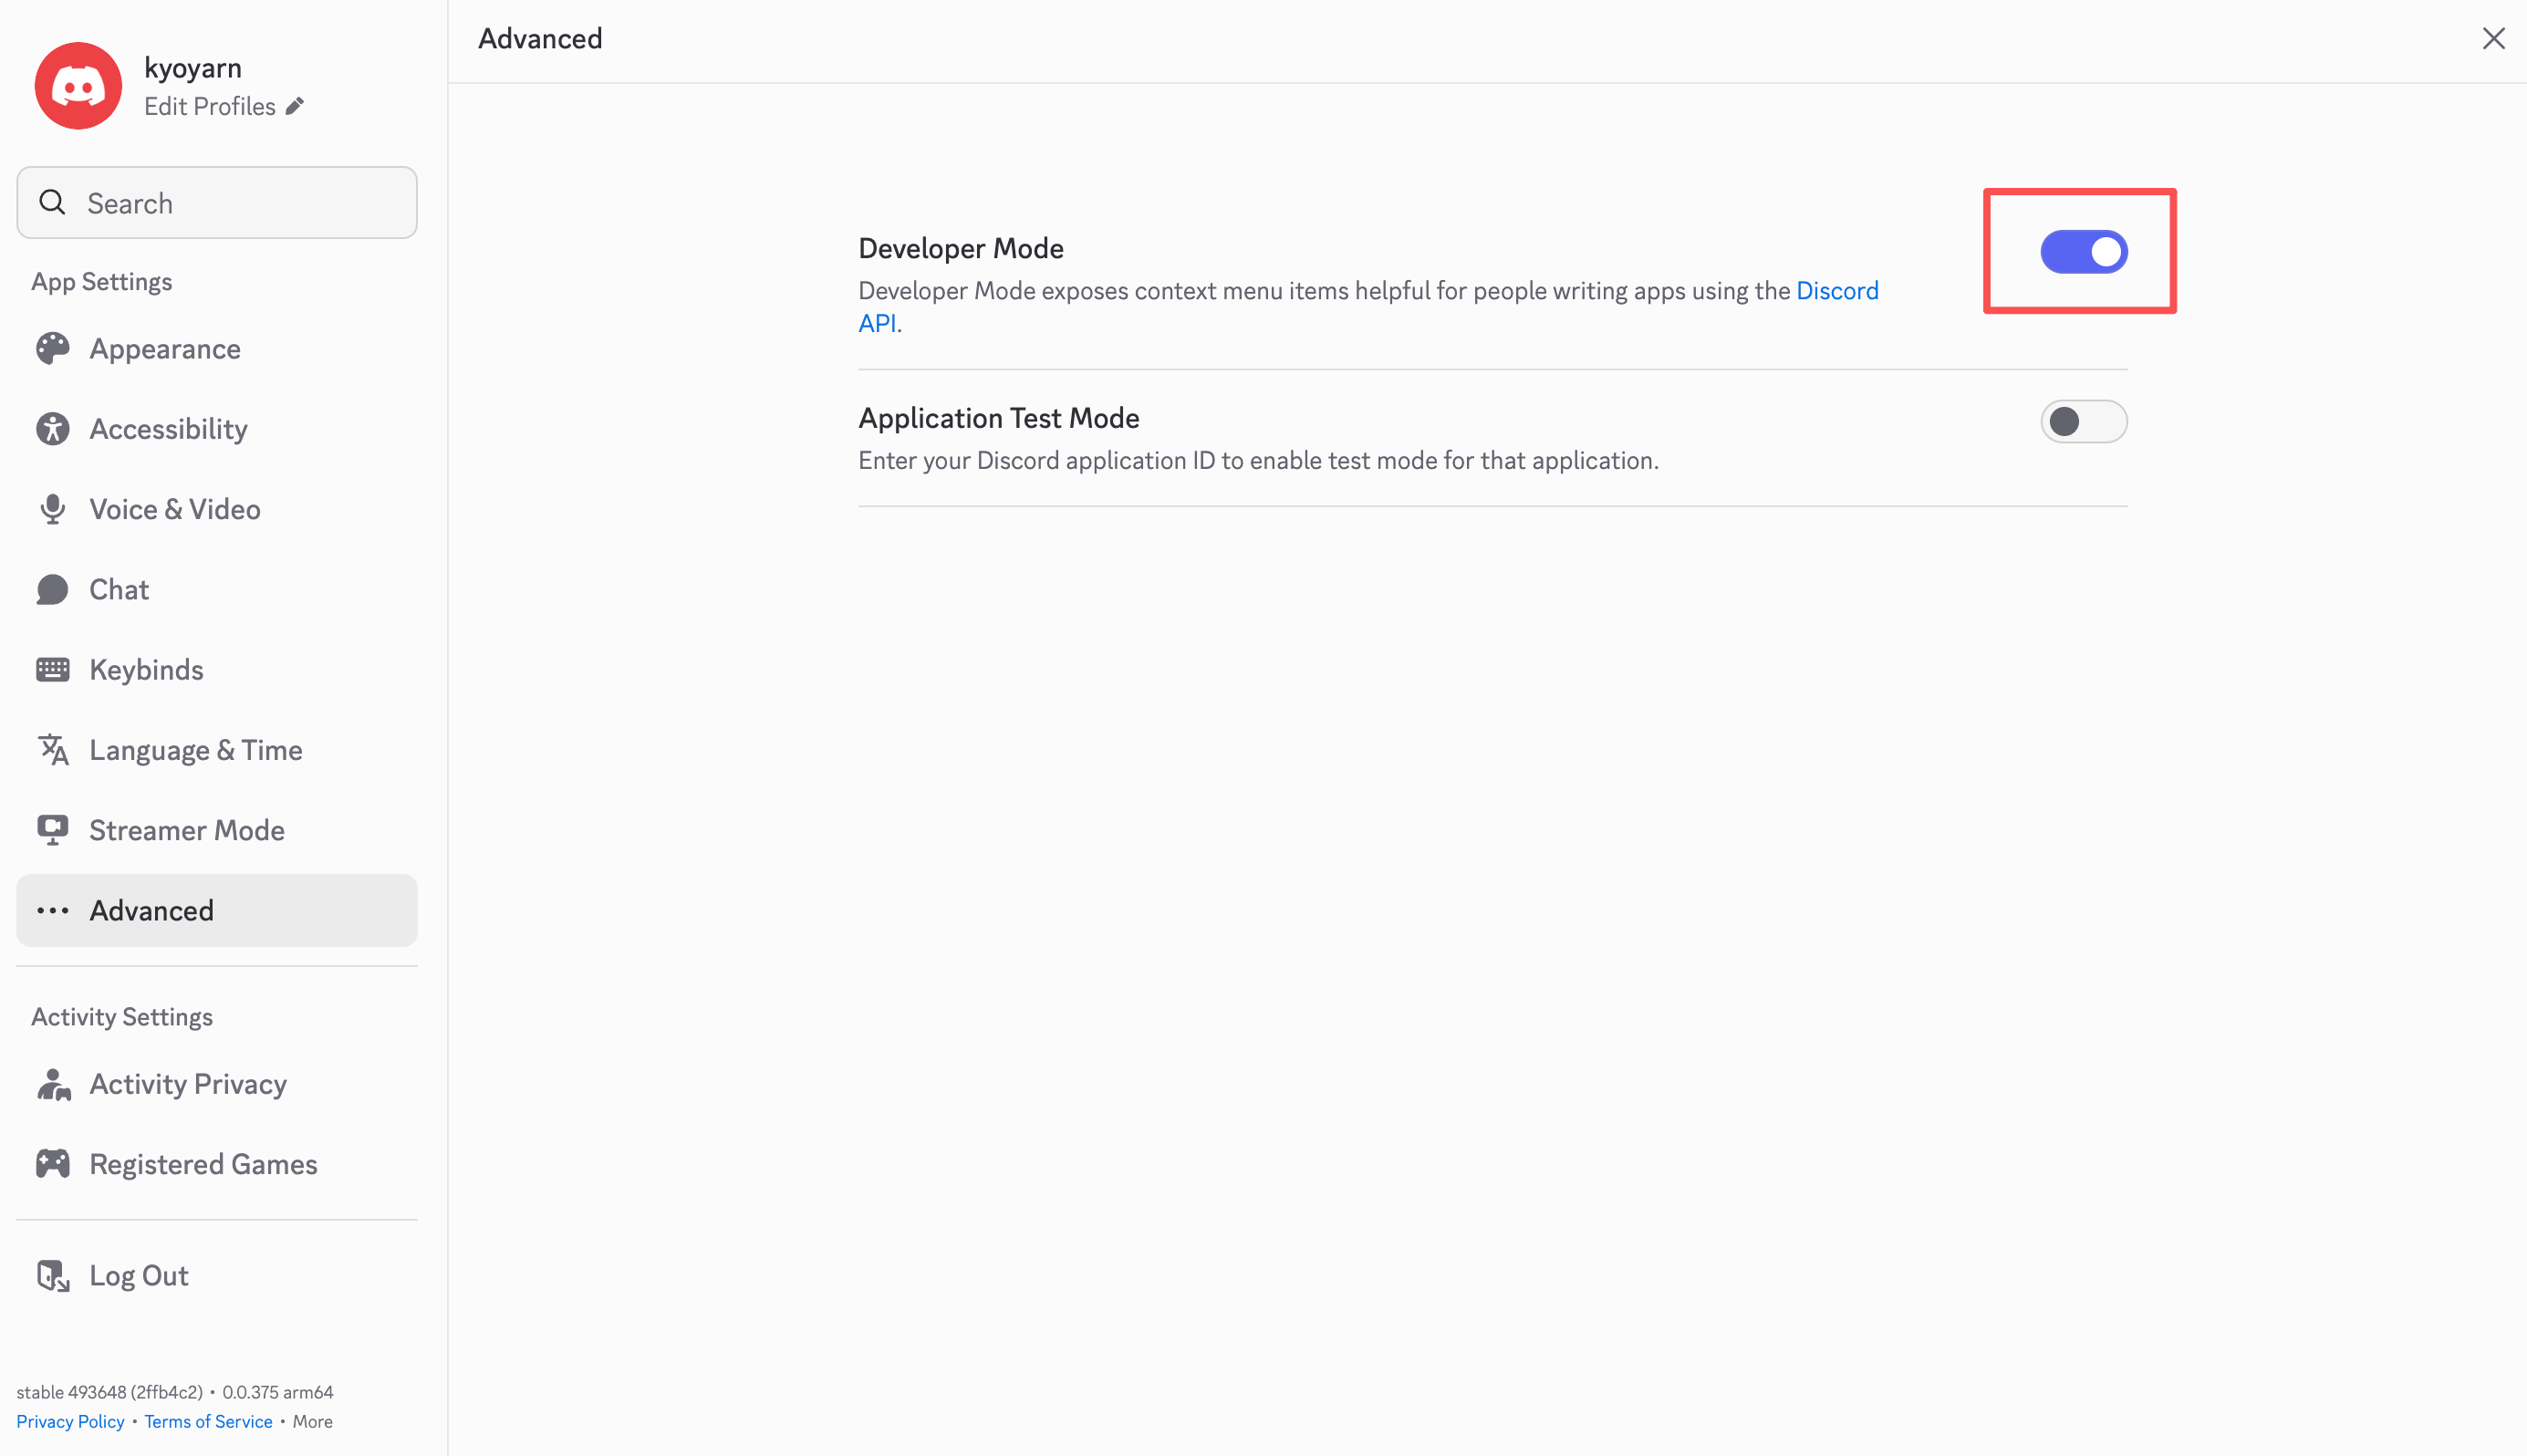
- Guild ID (Server ID): Right-click the server icon on the left -> Copy Server ID.
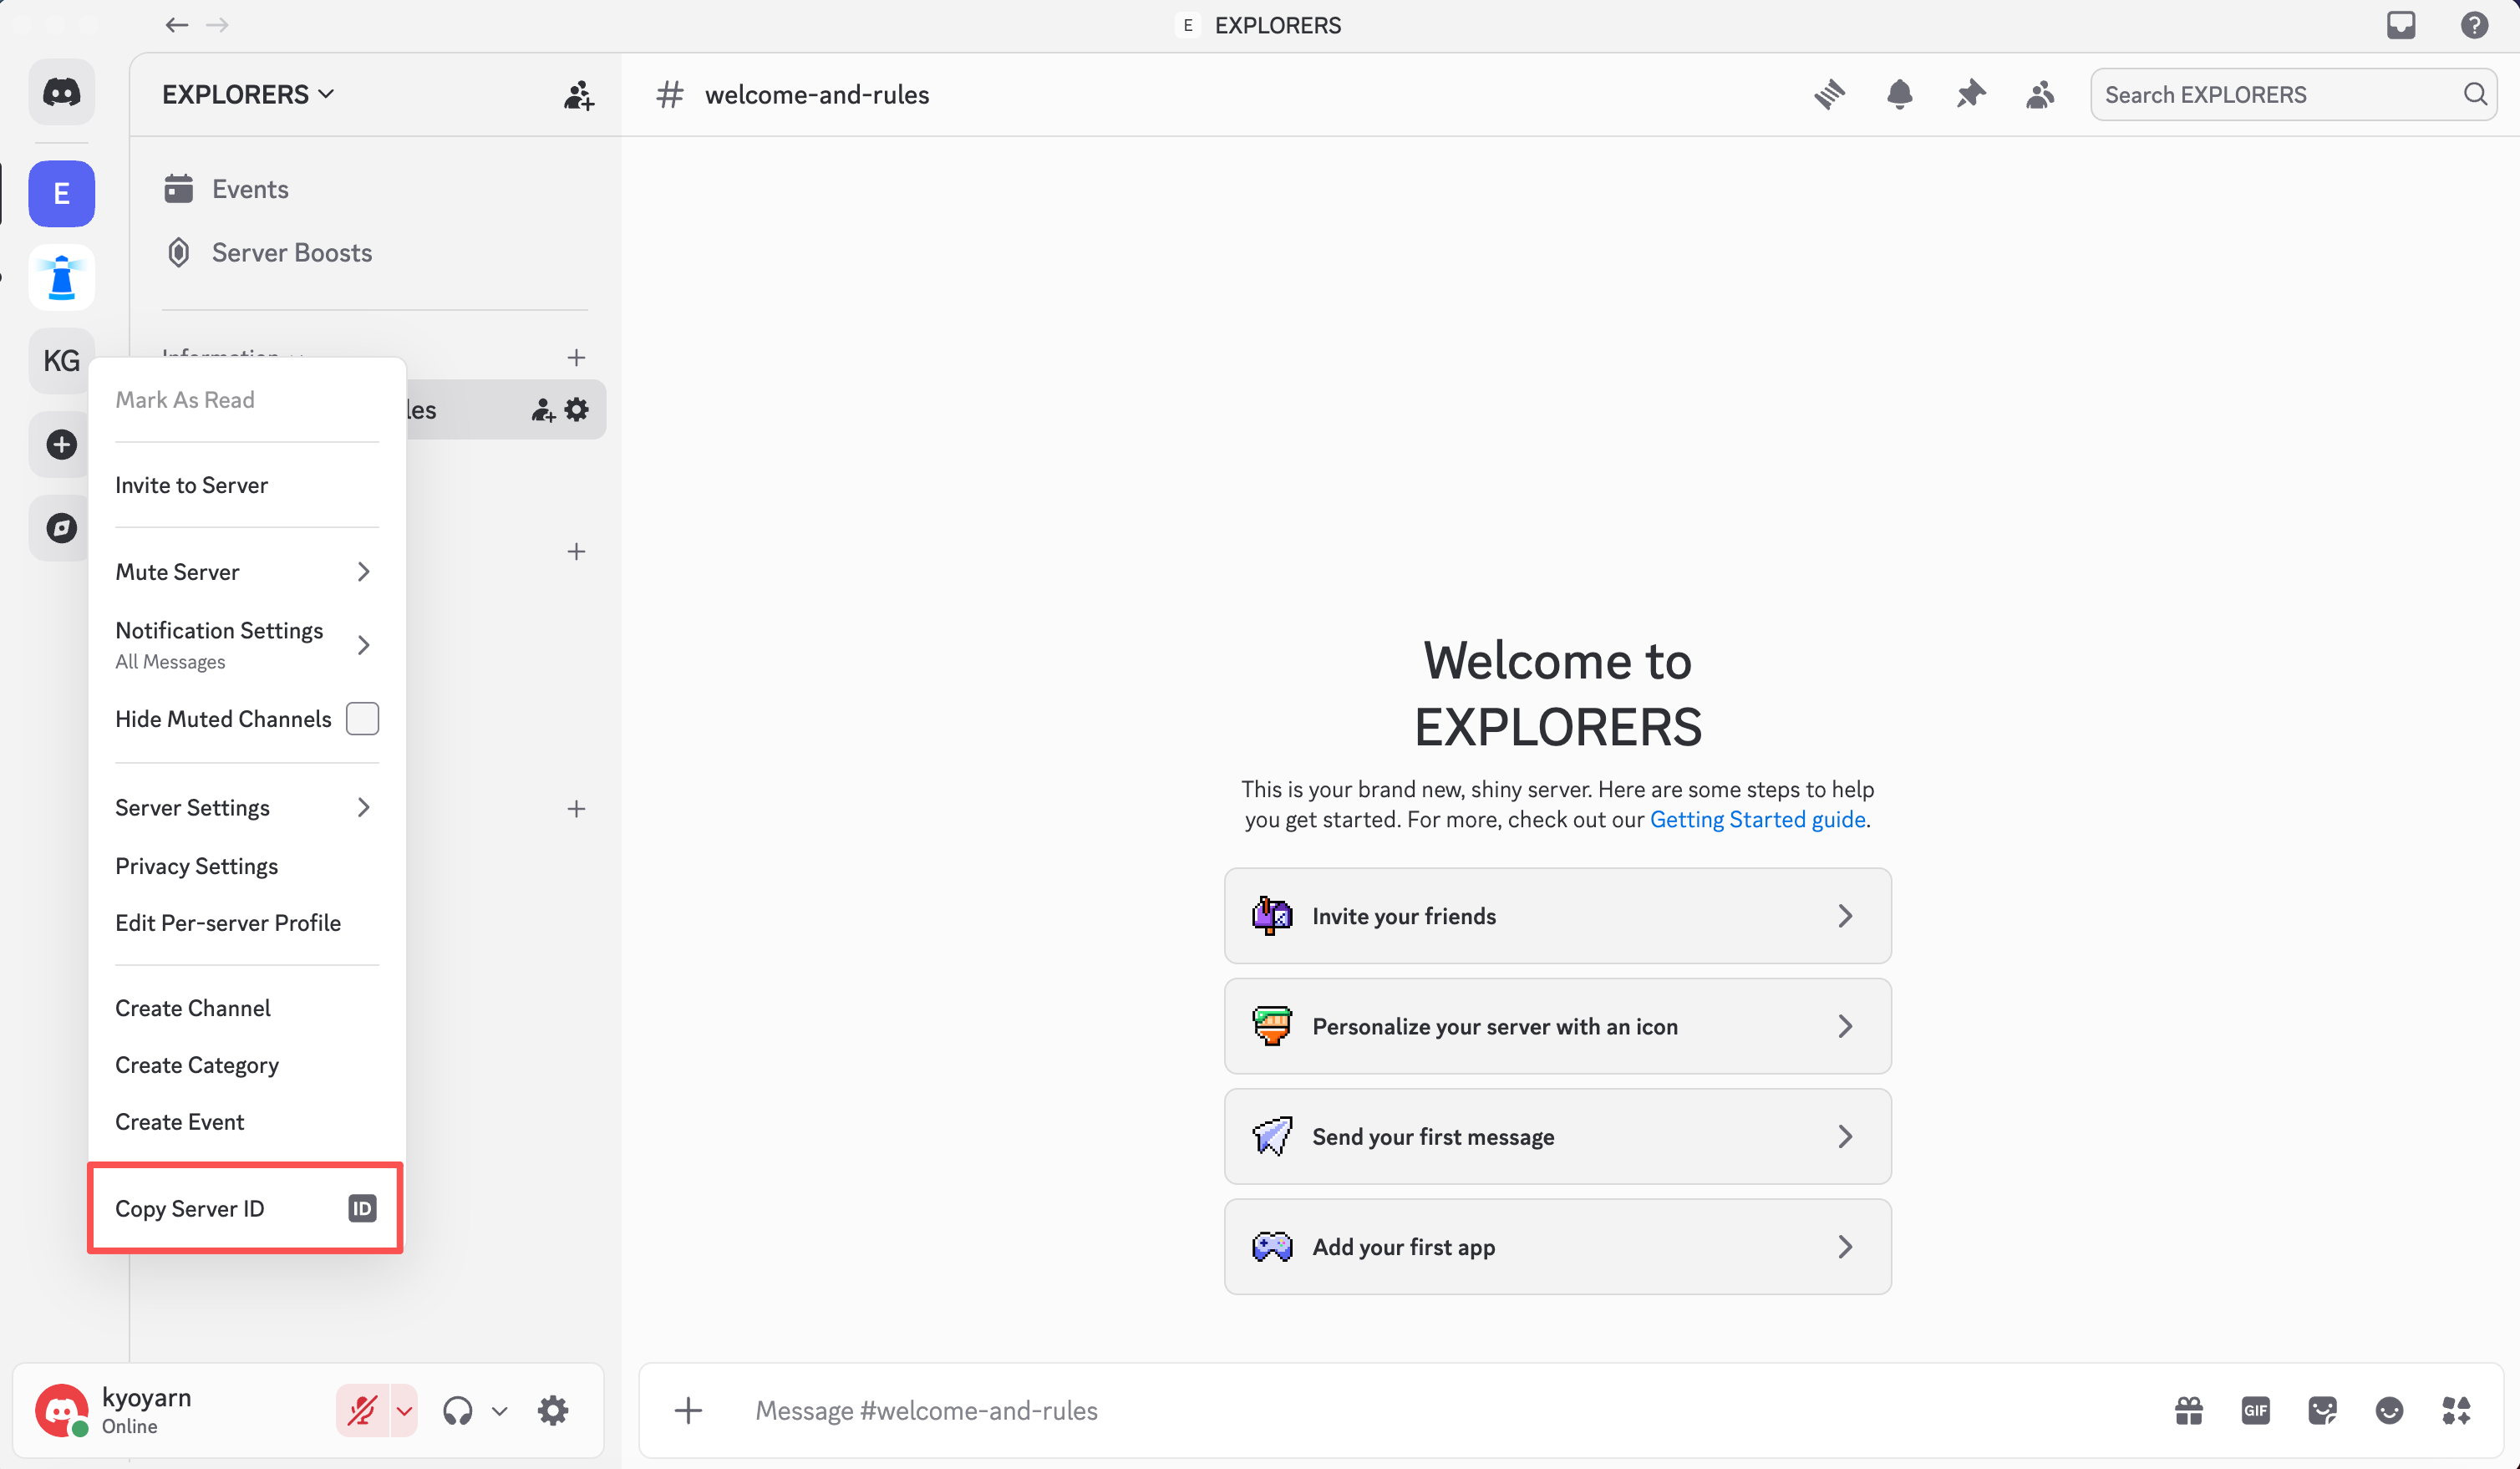
- Channel ID: Right-click the channel you want the bot to interact in -> Copy Channel ID.

2. Write the Configuration File #
Edit the config file using nano:
nano ~/.openclaw/openclaw.json
Copy and modify the following content (make sure to replace the Token and IDs):
{
  "channels": {
    "discord": {
      "enabled": true,
      "token": "PASTE_YOUR_DISCORD_TOKEN_HERE",
      "groupPolicy": "allowlist",
      "guilds": {
        "PASTE_YOUR_SERVER_ID_HERE": {
          "channels": {
            "PASTE_YOUR_CHANNEL_ID_HERE": {
              "allow": true
            }
          }
        }
      }
    }
  },
  "gateway": {
    // Allow access to the console via http://YOUR_SERVER_IP:4000
    "bind": "0.0.0.0"
  }
}
Press Ctrl + O then Enter to save, and Ctrl + X to exit.
3. Initial Test #
Don’t start the background service yet — run it manually first to see if it works:
openclaw gateway
- Check whether the logs show
Gateway connected. - Go to Discord and send
helloto see if the bot replies. - Once the test succeeds, press
Ctrl + Cto stop.
Phase 4: Process Management (Background Execution) #
Use Systemd to manage the service, ensuring the program keeps running after SSH disconnects and auto-starts on boot.
1. Enable User Linger #
Prevent the system from killing your processes after logout.
# Make sure you are the kyoyarn user
loginctl enable-linger $(whoami)
2. Set the Runtime Directory Variable #
export XDG_RUNTIME_DIR=/run/user/$(id -u)
(It’s recommended to add this line to the bottom of ~/.bashrc so it persists across logins.)
3. Register and Start the Service #
# 1. Install the service
openclaw daemon install

# 2. Start the service
openclaw daemon start

# 3. Check the status
openclaw daemon status
If you see a green Active: active (running), you’re all set! 🎉
Phase 5: FAQ & Troubleshooting #
Q1: Discord replies with “Agent failed… permission denied /root/…” #
Cause: This is a classic post-migration issue. Even though you’re logged in as kyoyarn, the config files still contain paths referencing /root.
Solution:
Run the following command to batch-replace paths in all config files:
find ~/.openclaw -type f -exec sed -i "s|/root/.openclaw|/home/$(whoami)/.openclaw|g" {} +
# Don't forget to restart after replacing
openclaw daemon restart
Q2: The bot is online but doesn’t respond to any messages (logs are silent too) #
Cause: Usually the Message Content Intent is not enabled in the Discord Developer Portal. Solution: Go to Discord Developer Portal -> Bot -> Enable Message Content Intent -> Save Changes.
Q3: Error “This channel is not allowed” #
Cause: The allowlist is active, but the current channel ID is not in openclaw.json.
Solution: Right-click to copy the current channel ID, add it to the config file, then run openclaw daemon restart.
Q4: How to view real-time error logs? #
Command:
journalctl --user -u openclaw -f
(Press Ctrl + C to exit the log viewer.)
Q5: How to completely stop or restart? #
- Restart (after modifying config):
openclaw daemon restart - Stop (for maintenance):
openclaw daemon stop